Outdoor Kitchen Layout
How to Layout an Outdoor Kitchen
You are probably at the point where you know which outdoor appliances you want in your outdoor kitchen. You might also have an idea of how you want the space to lay out. You might even have a proper scale drawing of your current outdoor space which you drew by hand or used an online software program to render.
You’ve also marked the locations of utilities on your rough outdoor kitchen drawing. If not, now is the time to call your local utilities and have them mark these locations on your property. This is a free service and is usually done within days of the call. After permitting, your city may require you to have these locations marked again before construction can start. You don’t need the worry of digging into an electric, gas or water line to add to the stress of your build.
The next step is to start to place the elements of your outdoor kitchen into a final design layout.
Show how and where these utilities will be routed into your outdoor kitchen space if you want to add them. Drainage pathways should also be marked, both for water you may bring in and for rain and runoff. This drawing will be used to create a light map if you plan on using electric lighting.
The correctness of the original scale sketch is critical to the overall design’s success. If you’re unsure about your abilities to draw a scale drawing , employ a local professional or use an online service to do it for you. Many online retailers have free design services if you are purchasing cabinets or appliances from them.
If you have a landscape designer you already work with, he or she can be helpful in siting your project to the best advantage of your backyard space.
Integrating Indoor and Outdoor Design
As you consider your backyard kitchen layout, remember that outdoor spaces do not exist in a vacuum, and they work best when they are related to the shape of your garden and home.
Gardens should be created in close proximity to their dwellings, according to one guideline of landscape design. This includes having garden walkways that are extensions of your doorways and halls, and replicating the scale of your indoor rooms outside.
As an example, if your kitchen is 12 feet square and you’re constructing an outdoor kitchen just beyond your kitchen door, you may build a stone patio area that reflects the 12 foot square. If the outside space is a long way beyond that door, build a path that runs parallel to and in proportion to the door, creating a natural flow between the two spaces.
Adding Elements to the Plan
All of the existing landscape features should be on your scale drawing. The walkways, appliances, counters, and other built components of the plan, such as the patio or deck areas, are all elements to consider adding at this point.
Consider the work triangle in your kitchen design, allowing for ample space between the sink, refrigerator and grill to be able to work efficiently. Efficient outdoor kitchen layouts that are tried and true include galley style, l-shaped, u-shaped and linear.
Remember the work triangle from your indoor kitchen layout? You should incorporate that triangle into the four zones of a good outdoor kitchen layout (wet zone, prep zone, hot zone and cold zone). Each should all have enough counter space above or beside each area to be able to complete each task.
Indicate new planting areas and other features on your drawing as well. Keep in mind that most renderings are scaled at 1/4″=1′, so your layout will be consistent throughout your project.
Design Plan Checklist
- How have you defined the kitchen and/or eating spaces’ perimeter?
- What type of flooring will be used in the kitchen: grass, stone, concrete, pavers, wooden decking, or bricks?
- Have you protected the eating and/or cooking areas from the elements?
- Have you considered installing a gas line now or in the future?
- Is there enough light to adequately cook and clean? Is there enough light in the area where you’ll be eating or entertaining?
- Is the path to the kitchen properly lit and easy to follow? Is the journey from the cooking area to the eating area, assuming they’re divided, the same?
- Have you noted all of the electrical connections and routes on your plan, both those that are presently there and those that will be added?
- Have you thought about how many outlets you’ll need to power anything from a blender to a fountain to the party lights?
- Have you considered installing ceiling fans?
- Do you wish to extend the season with a heater or a live fire element?
- Have you thought about how you’ll get water (a hose, or would you need to run piping) if you want an outside sink? Have you thought about drainage?
- Have you made plans to drain any pipes at the end of the season if you live in an area where water can freeze?
- Are the smoke-generating appliances positioned to benefit from prevailing breezes? Have you placed them as far away from chairs as possible?
- How is the equipment for the outdoor kitchen protected from the elements?
- Have you double-checked that there is enough room around the table and chairs to stroll around comfortably?
- Is there enough space to store the outside furniture when it’s not in use? Will you utilize covers or not?
- Do you have a plan for how you’ll dispose of trash?
- Do you know what, if anything, you might wish to add in the future, and have you budgeted appropriately for it? Have you thought about utilities and anything else that necessitates digging?
- Have you made your kitchen as attractive and functional as possible?
Filling Out Your Outdoor Kitchen Plan
Start by selecting a layout configuration. These are straight run, ushaped layout, l shaped layout, kitchen island and galley style. Most outdoor kitchen design software will make this step easy with pre-built templates you can modify to your preferences. Take advantage of the free kitchen design software that is hosted on manufacturer sites.
1. Appliance layouts come first. Their location will be dictated by the availability of nearby utilities. Add your builtin grill, pellet grill, pizza ovens and your other kitchen appliances within the layout configuration you’ve chosen. Keep in mind that every appliance should have a space allocated for its location and adjacent countertop space for food prep, plating and serving. You should also make sure that the workflow is efficient for your style of outdoor cooking.
2. Once the appliances have been placed on your layout, the next step is to fill in the areas between them. Start with base cabinets. These cabinets can be as narrow as 12″ wide all the way up to 30″ wide for modular units. If you are building the kitchen cabinetry yourself, you can make your cabinets any width you want. Every base cabinet will have a countertop. The more countertop space you need between appliances, the more base cabinets you need or wider width cabinets to fill the space.
Think about what you will be doing in that particular area when selecting a base cabinet configuration. If you will be chopping veggies, think about base drawer cabinets to hold your knives and other utensils. Your sink will require a base cabinet with doors for storage and for plumbing access. Specialty cabinets that slide out such as wastebasket holders, or cabinets with slide out drawers are options if you don’t want to bend over and reach way back in a cabinet.
Builtin grills will need base grill cabinets with drawers for utensils and cabinet doors to conceal the propane tank or natural gas hookup. There are other base cabinets that are specifically made for housing a warming drawer or side burner. Manufacturers of prefab outdoor kitchens have a pretty broad selection of cabinetry options so you can get the functionality and storage that is perfect for the space you have available.
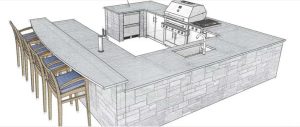
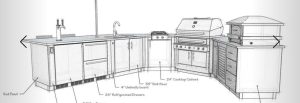
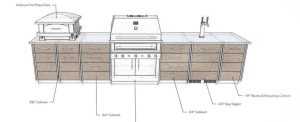
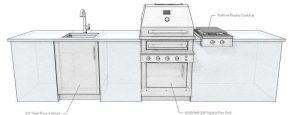
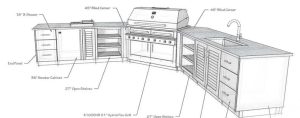
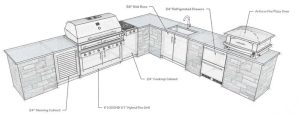
Sample Outdoor Kitchen Layout Options
Sometimes it’s helpful to see how others have laid out their outdoor kitchen space. Kalamazoo Outdoor, a manufacturer of prefab outdoor kitchens, has a few sample layouts to help you visualize your own space. Below are some of their kitchen ideas.
