Halloween Door Decorations
Step Aside Cobwebs: 8 Halloween Door Decorations Nobody Else Will Try
Halloween door decorations can go far beyond pumpkins on the steps and cobwebs on the doorframe. You can turn your front entry into a full scene that feels like part of the night’s entertainment. By using your door and porch as a stage, you create an immersive design that works for contests, trick-or-treaters, and even outdoor parties.
At CookDrinkDecorate.com, you love to host and make every detail count. That’s why these themed door designs focus on more than just looks—they set the tone for the entire evening. When you lean into bold, recognizable scenes and give them a creative twist, your entryway becomes more than decoration—it becomes the opening act.
The Birds (Hitchcock)
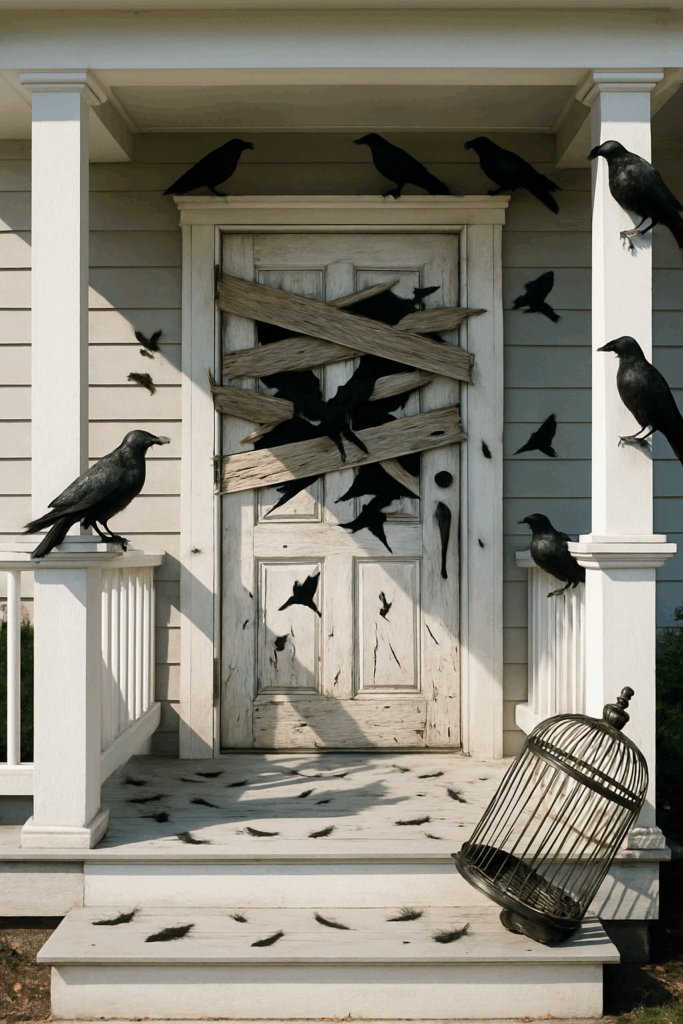
Transform your front door into a scene inspired by Alfred Hitchcock’s The Birds. To capture the attic setting, cover the door with faux wooden boards angled and cracked as if birds are forcing their way through. This layered look creates a strong base for your Halloween door decorations.
Add black feather cutouts across the boards and scatter loose feathers on the steps. Place several realistic black bird props on porch railings, eaves, and window ledges. A tipped birdcage near the doormat adds a subtle detail that suggests chaos spilling outside.
Use focused overhead lighting to cast shadows of wings and boards across the entry. Rope, straw, and textured wood help the door resemble an attic under attack. These materials also give depth to your Halloween front door decorations.
For contests or neighborhood displays, keep the theme consistent from the door to the porch. Integrating props across the railing and steps makes your Halloween outdoor decorations feel more complete. This approach works well for a Halloween door decorations contest or when you want your front door Halloween decor to stand out.
Psycho Shower Scene
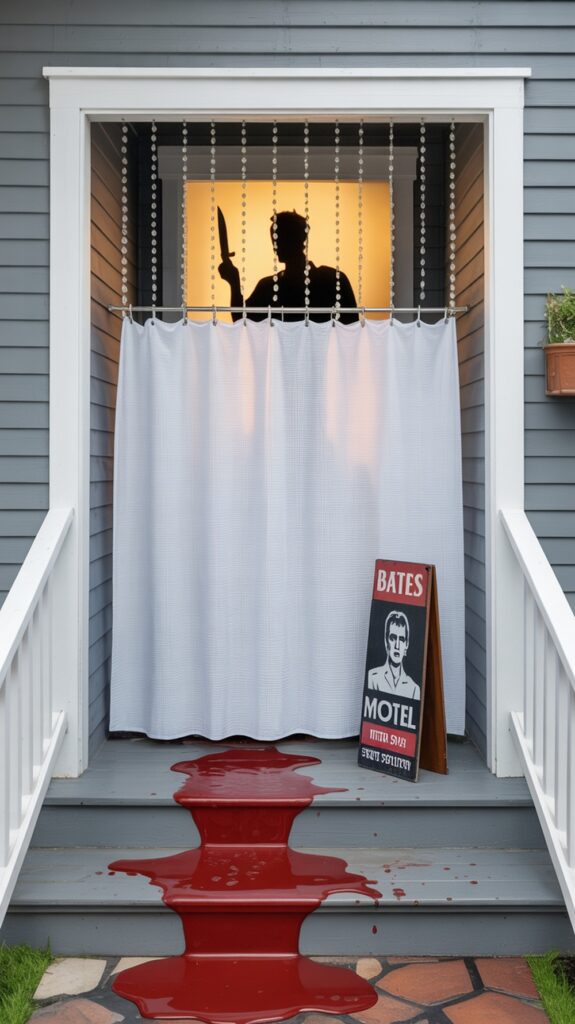
Turn your front door into a scene inspired by the classic Psycho shower moment. Hang a white shower curtain across the doorway and use a light behind it to project a clear silhouette. The shadow of a raised knife will stand out and create a strong focal point for your Halloween door decorations.
Add beaded crystal strands to mimic dripping water and hang them in front of the curtain. This small detail helps sell the look and makes your Halloween front door decor more convincing. A bath mat placed at the threshold with red “water” spilling onto the steps adds another layer of detail.
Props tied to the Bates Motel theme can give your Halloween outdoor decorations more context. A towel rack, a motel-style key tag, or a simple “Bates Motel” sign can make the scene recognizable even without explanation. These touches also work well for a Halloween door decorations contest where creativity matters.
Lighting is the key to this setup. Use translucent materials so the silhouette is visible from the street. Careful placement of the light will ensure the shadow reads clearly, making your Halloween front doors stand out among other Halloween door contest ideas.
Headless Horseman
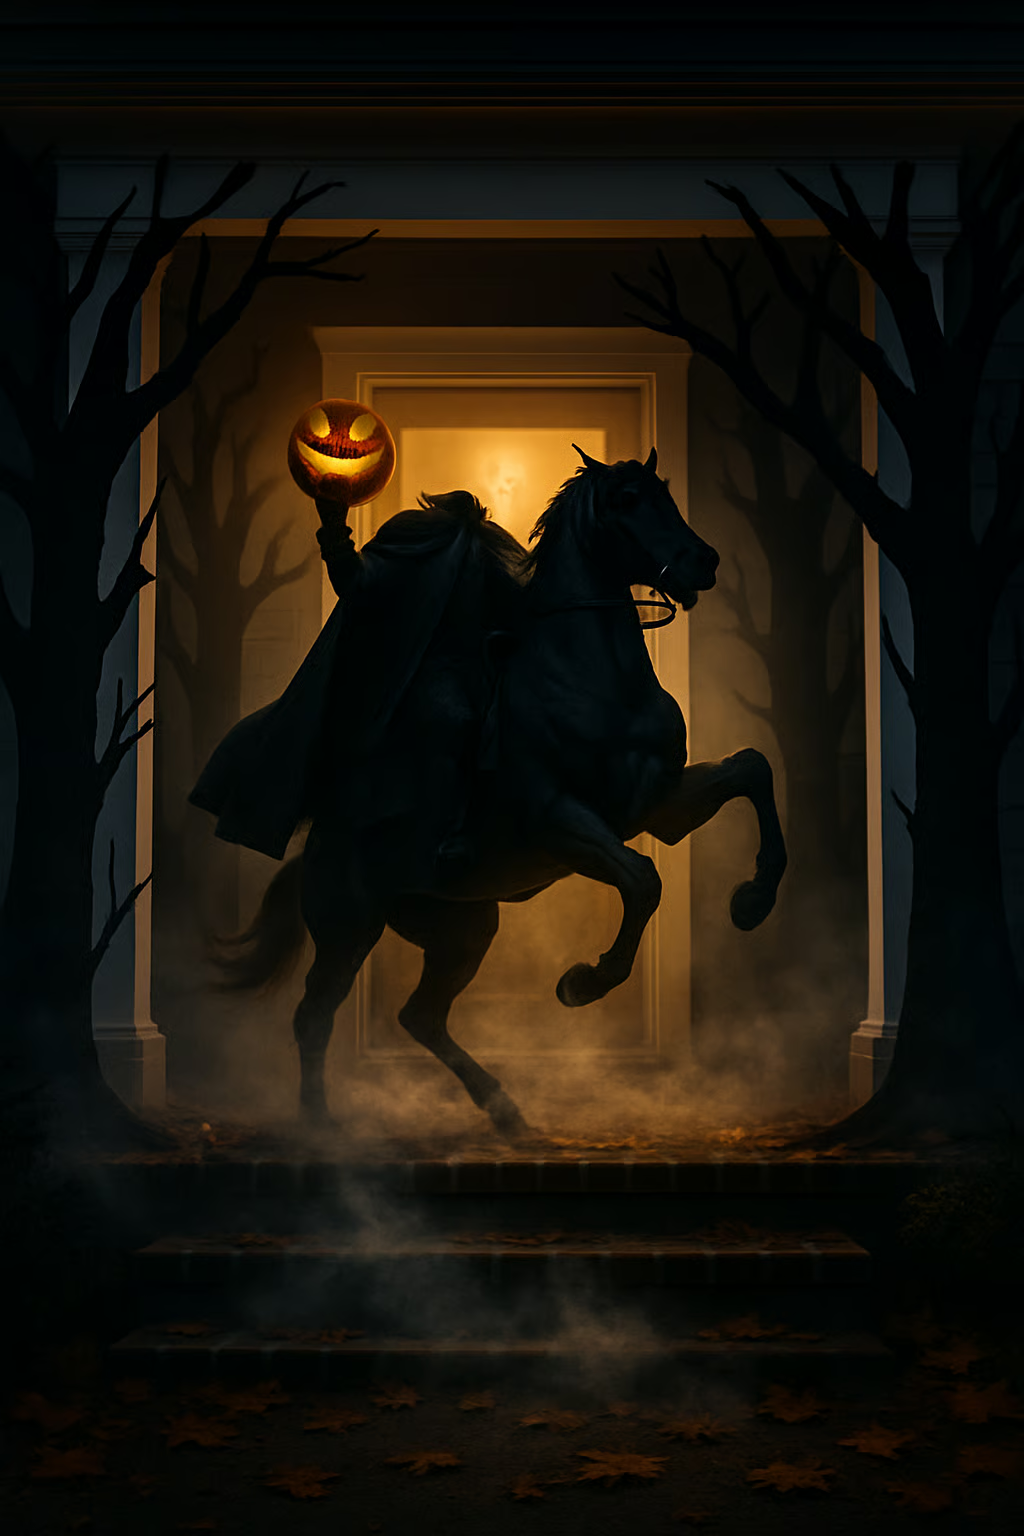
Design your front door with a Sleepy Hollow scene by centering it around the Headless Horseman. A life-sized figure holding a glowing pumpkin head makes a strong focal point for Halloween front door decorations. Position it close to the entry so it becomes the first thing visitors notice.
Frame the doorway with painted tree silhouettes to give the look of a dark forest. This simple backdrop helps the horseman stand out and adds depth without taking up much space. It works well for both Halloween door decor and larger outdoor displays.
Place fog machines on either side of your steps to create a low mist. The haze adds atmosphere but still allows the glowing pumpkin head to shine clearly. This balance makes the setup effective for a Halloween door decorations contest where details matter.
Scatter faux autumn leaves along the path leading to your porch. This small touch connects the outdoor space with your front door Halloween decor. It also guides guests toward the main display, making the scene feel complete.
This design works for Halloween front doors, contests, or general Halloween outdoor decorations. By combining light, props, and simple accents, you create a clear theme that feels polished and recognizable.
Haunted Mansion Stretching Room
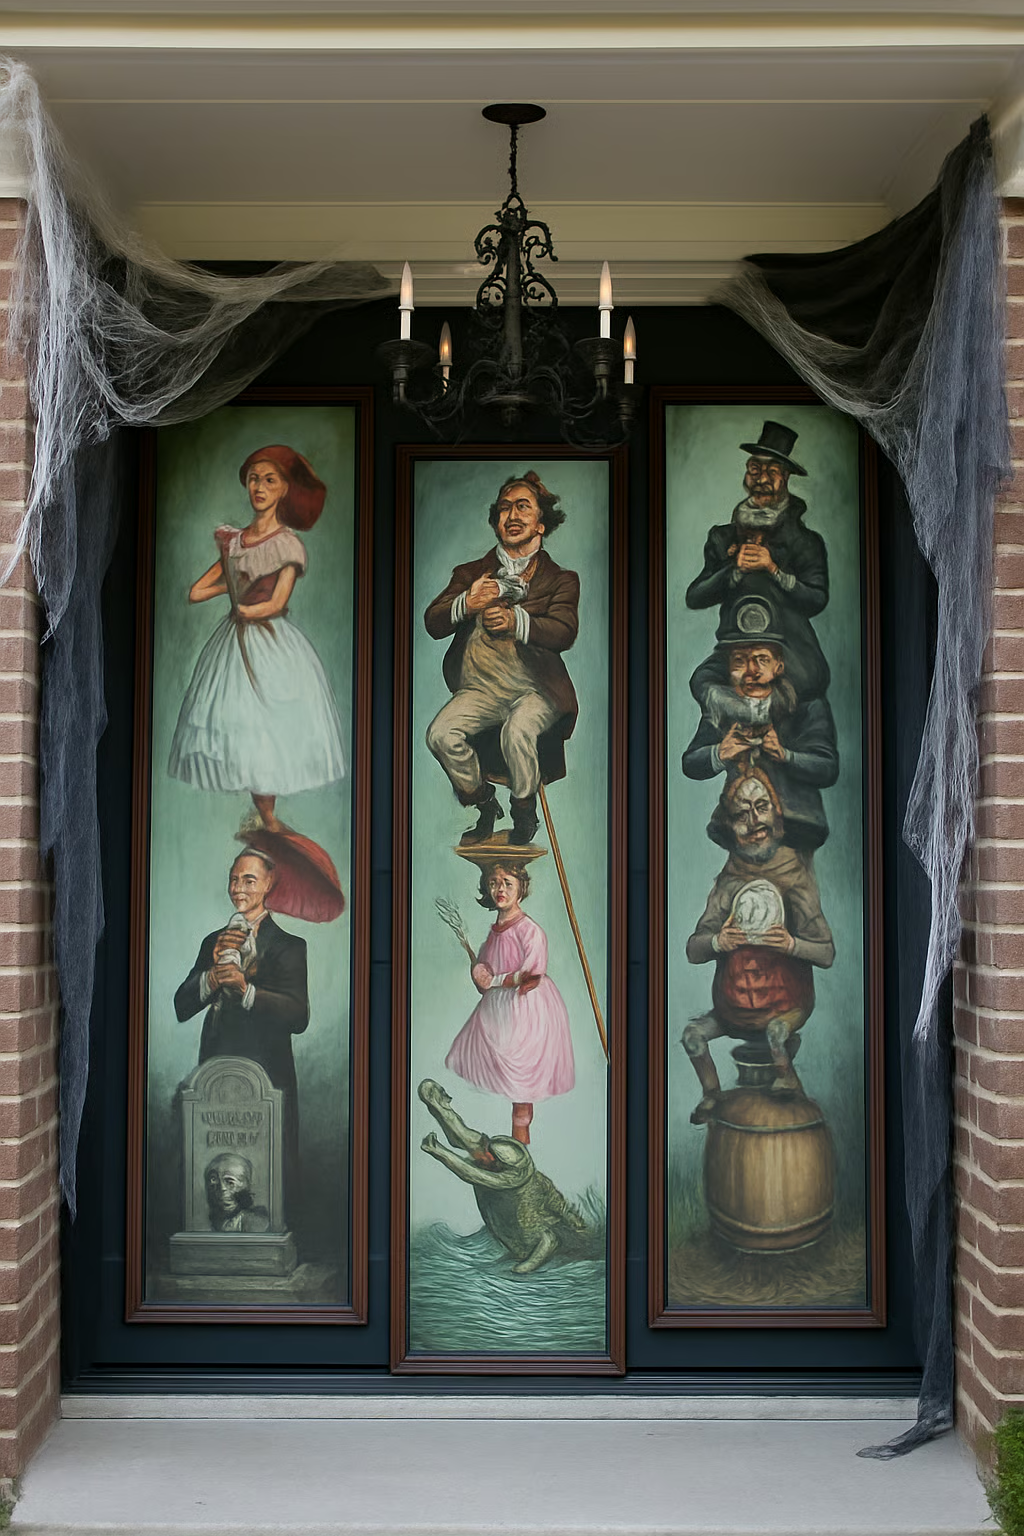
Channel the Haunted Mansion Stretching Room by using tall portraits on your front door. Place the “normal” figures at the top and their odd stretched endings at the bottom, such as the tightrope walker over an alligator or the man sinking in quicksand. This creates a vertical illusion that feels true to the attraction.
To make the effect stronger, frame the portraits with fabric or painted scrolls that emphasize the stretch. Printed panels or detailed artwork work best since the design relies on fine lines and shading. Adding them to both the door and side panels makes the scene feel more complete.
For atmosphere, mount a flickering chandelier prop or wall sconce above the door. Pair it with low organ music to set the tone as guests approach. These details help your Halloween front door decorations stand out in any neighborhood or Halloween door decorations contest.
This idea works well for Halloween outdoor decorations because it transforms your entryway into a themed space. By focusing on accuracy and detail, your haunted mansion door decor will impress visitors and bring a unique twist to typical Halloween front doors.
Munsters’ Door (1313 Mockingbird Lane)
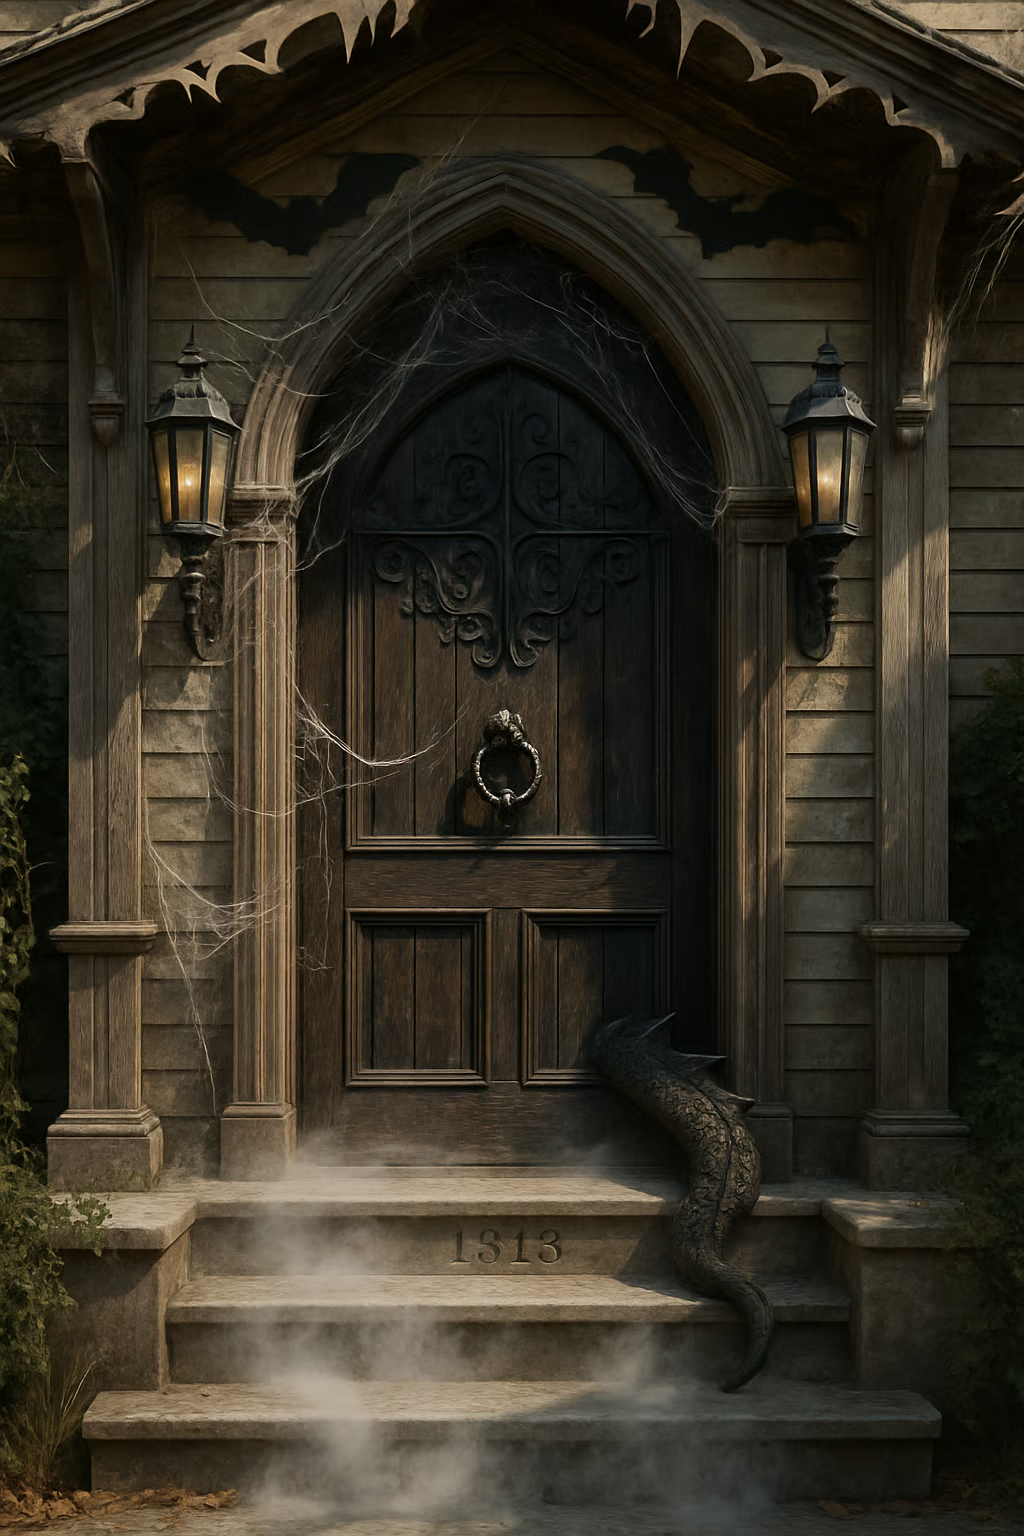
Set the stage with a playful version of the Munsters’ famous door at 1313 Mockingbird Lane. Start with a Gothic-style wood door look, using dark paint or a removable cover. Add faux iron scrollwork and a bold knocker to echo the original design.
For front door Halloween decor, drape cobwebs across the frame and hang small bats along the eaves. Place gothic lanterns on each side of the entry to give a dim, moody glow. These touches balance spooky style with a classic TV reference.
A fog machine or dry ice pot near the steps makes a strong impact without hiding the details of your Halloween front door decorations. The mist rolling low across the ground adds atmosphere that works well for Halloween outdoor decorations.
To bring in humor, place a prop of Spot the dragon’s tail peeking from under the door. This playful detail helps your setup stand out in a Halloween door decorations contest. Mixing lighthearted elements with eerie design creates a door display that feels both fun and memorable.
Wicked Witch Under the House (Wizard of Oz)
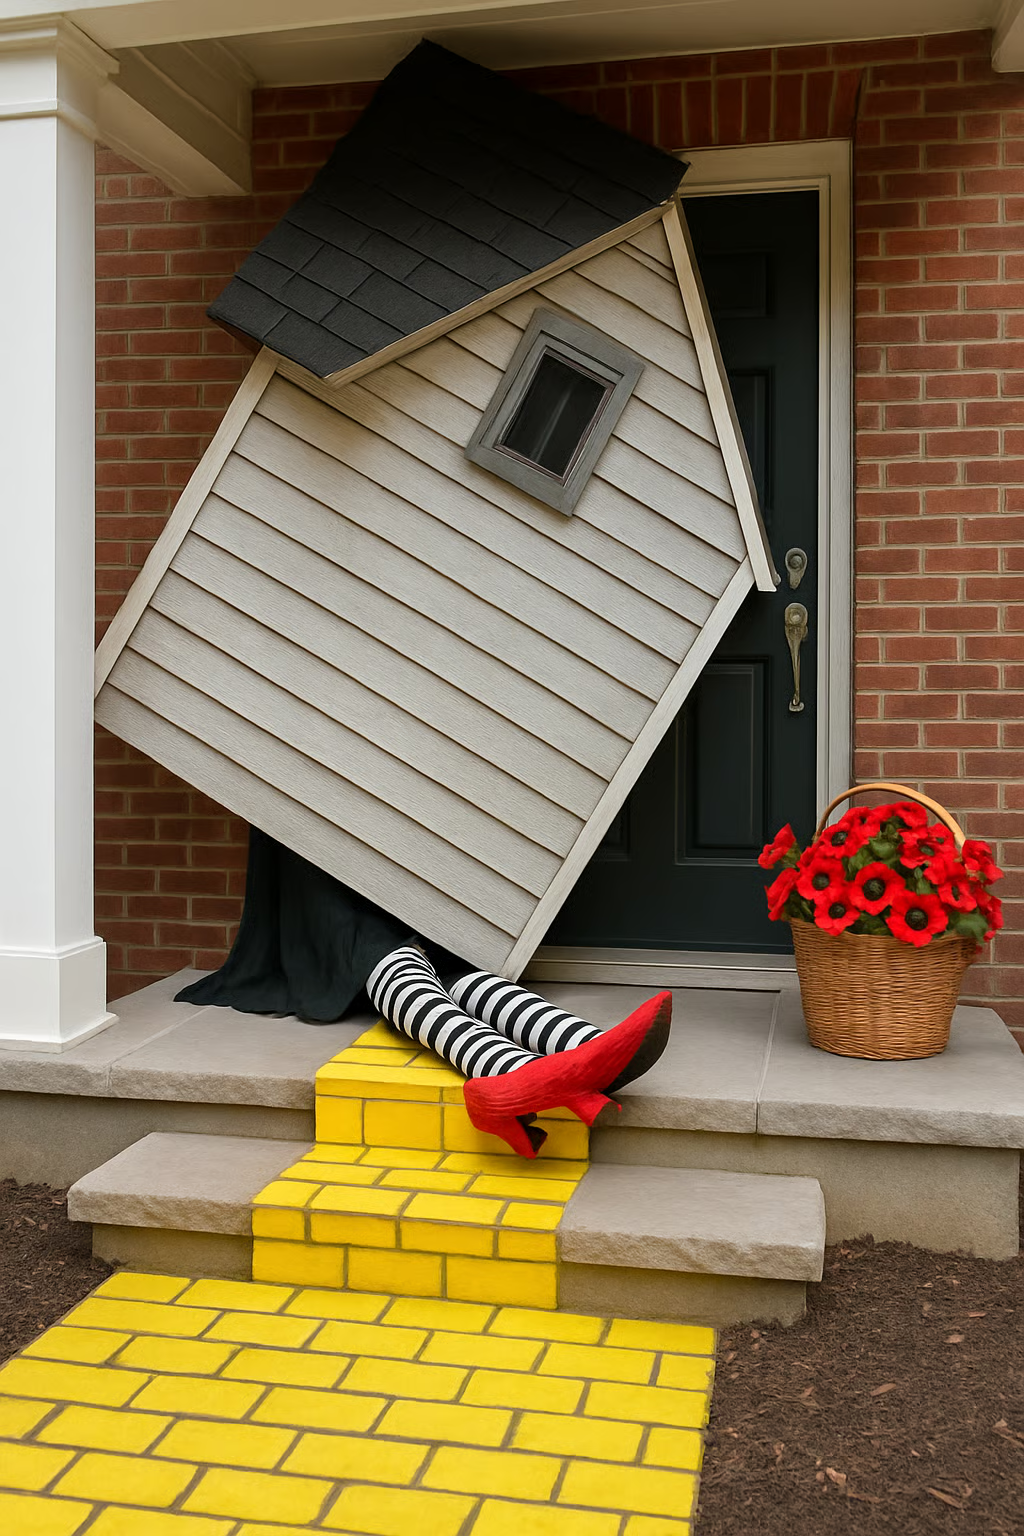
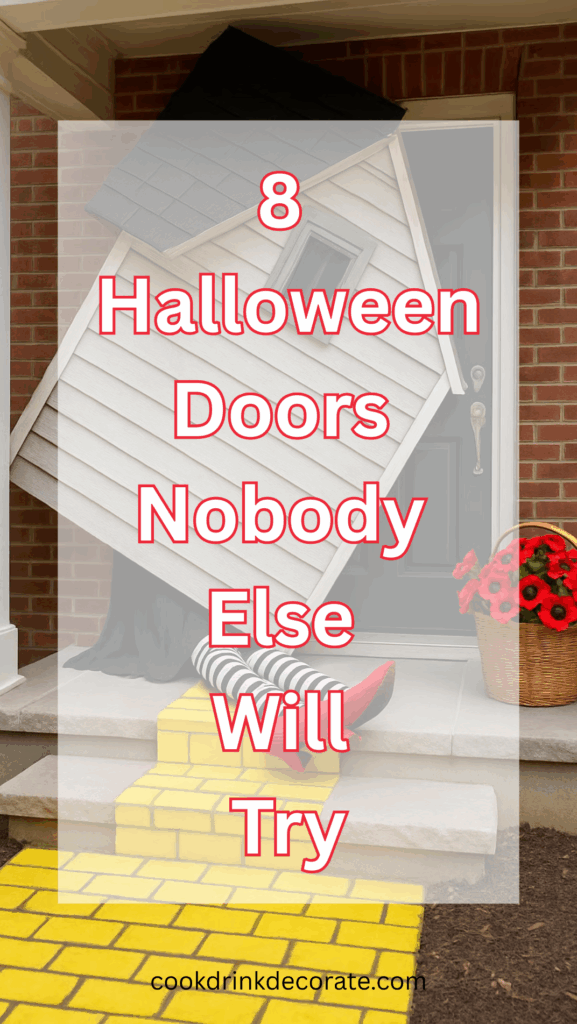
Try a clever Wizard of Oz scene by recreating the moment when the Wicked Witch of the East meets her fate. Build a lightweight faux wall or roof section above your door to look like part of a house has landed. This creates a bold backdrop for your Halloween door decorations.
Place striped stockings with glitter shoes or ruby slipper replicas sticking out from under the faux wall. This detail makes the setup instantly recognizable and adds humor to your Halloween front door decorations. It also works well for a Halloween door contest because it stands out from traditional spooky designs.
Lay down a yellow brick road runner leading up to your steps. Add a small basket of faux poppies nearby to tie in more Wizard of Oz details. These bright touches balance the darker witch theme and make your Halloween outdoor decorations feel more playful.
This idea works especially well if you want your Halloween front doors to be colorful instead of frightening. The mix of bold colors, familiar imagery, and lighthearted humor makes it a strong choice for any Halloween door decor contest.
Spooky Face Trees (Wizard of Oz)
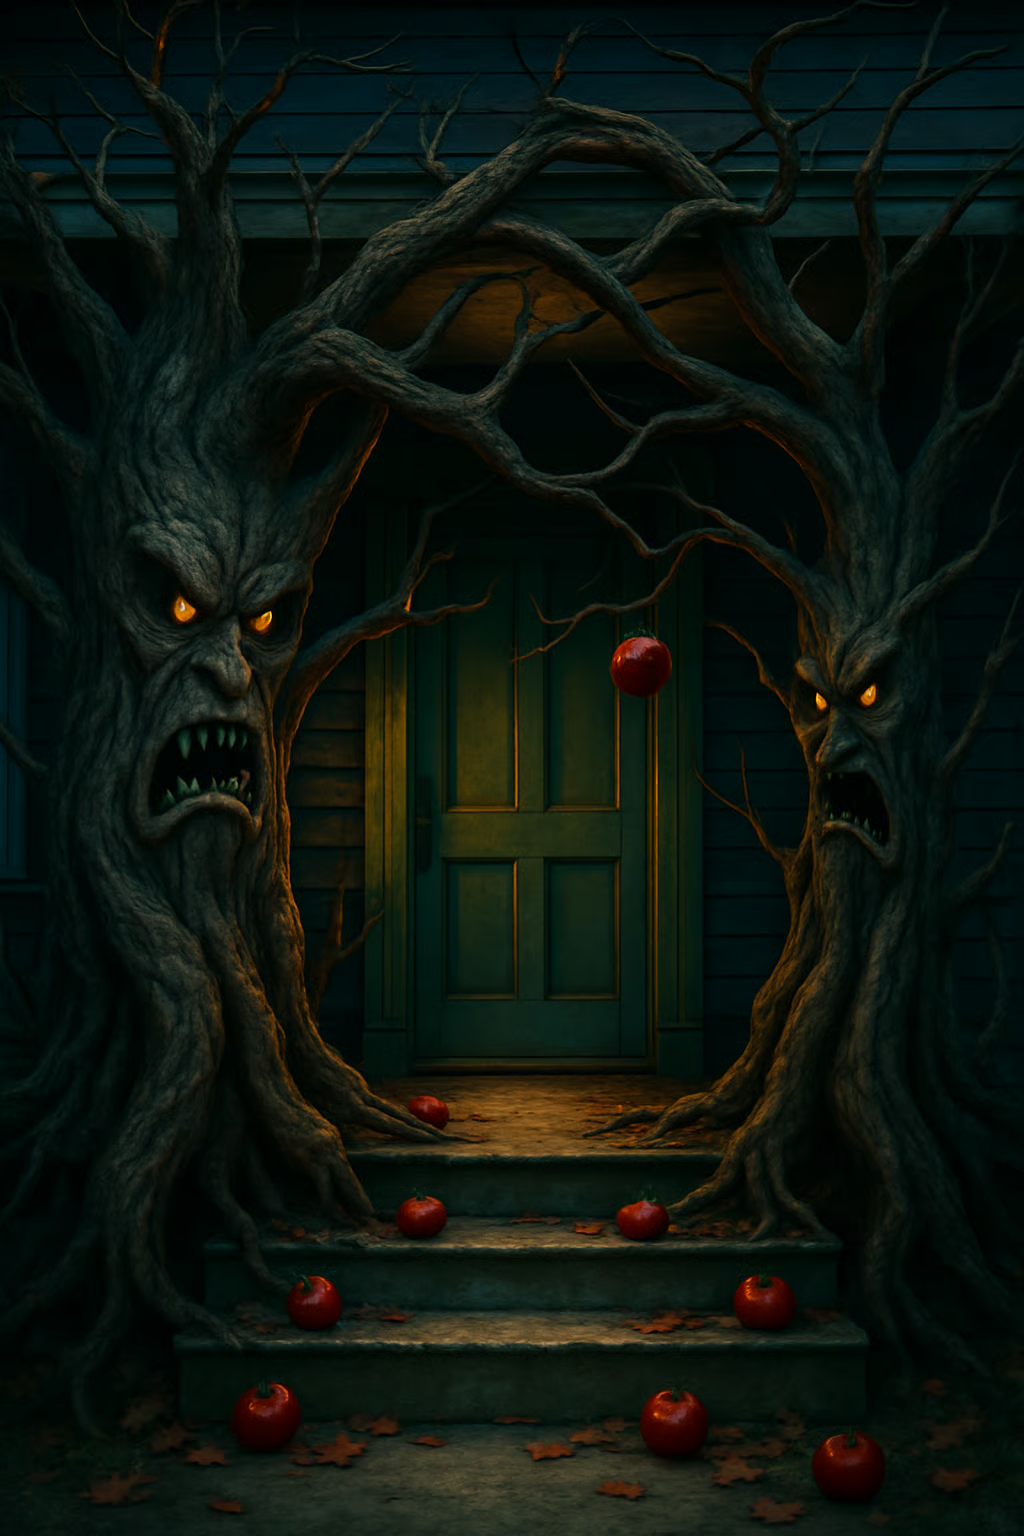
Build out a scene from the Wizard of Oz by recreating the haunted forest. Start by covering the door with painted tree trunks that stretch across the surface. This makes the entryway look like you’re walking into a grove of eerie, living trees.
Add branches that extend outward like arms reaching for anyone who comes close. Carve or paint twisted faces into the trunks so each tree looks alive and unfriendly. This detail works well for Halloween door decorations and adds depth to your display.
For a playful touch, place a branch holding a single apple as if ready to throw it. Scatter a few bright red apples on the steps and porch floor to tie the look together. This small step connects the design to the classic Wizard of Oz scene.
This style of Halloween front door decorations works for both contests and casual displays. It gives you a bold way to stand out in a Halloween door contest without relying on overly scary elements. The mix of color, character, and simple props makes it a strong option for outdoor Halloween decor.
Jaws Attack
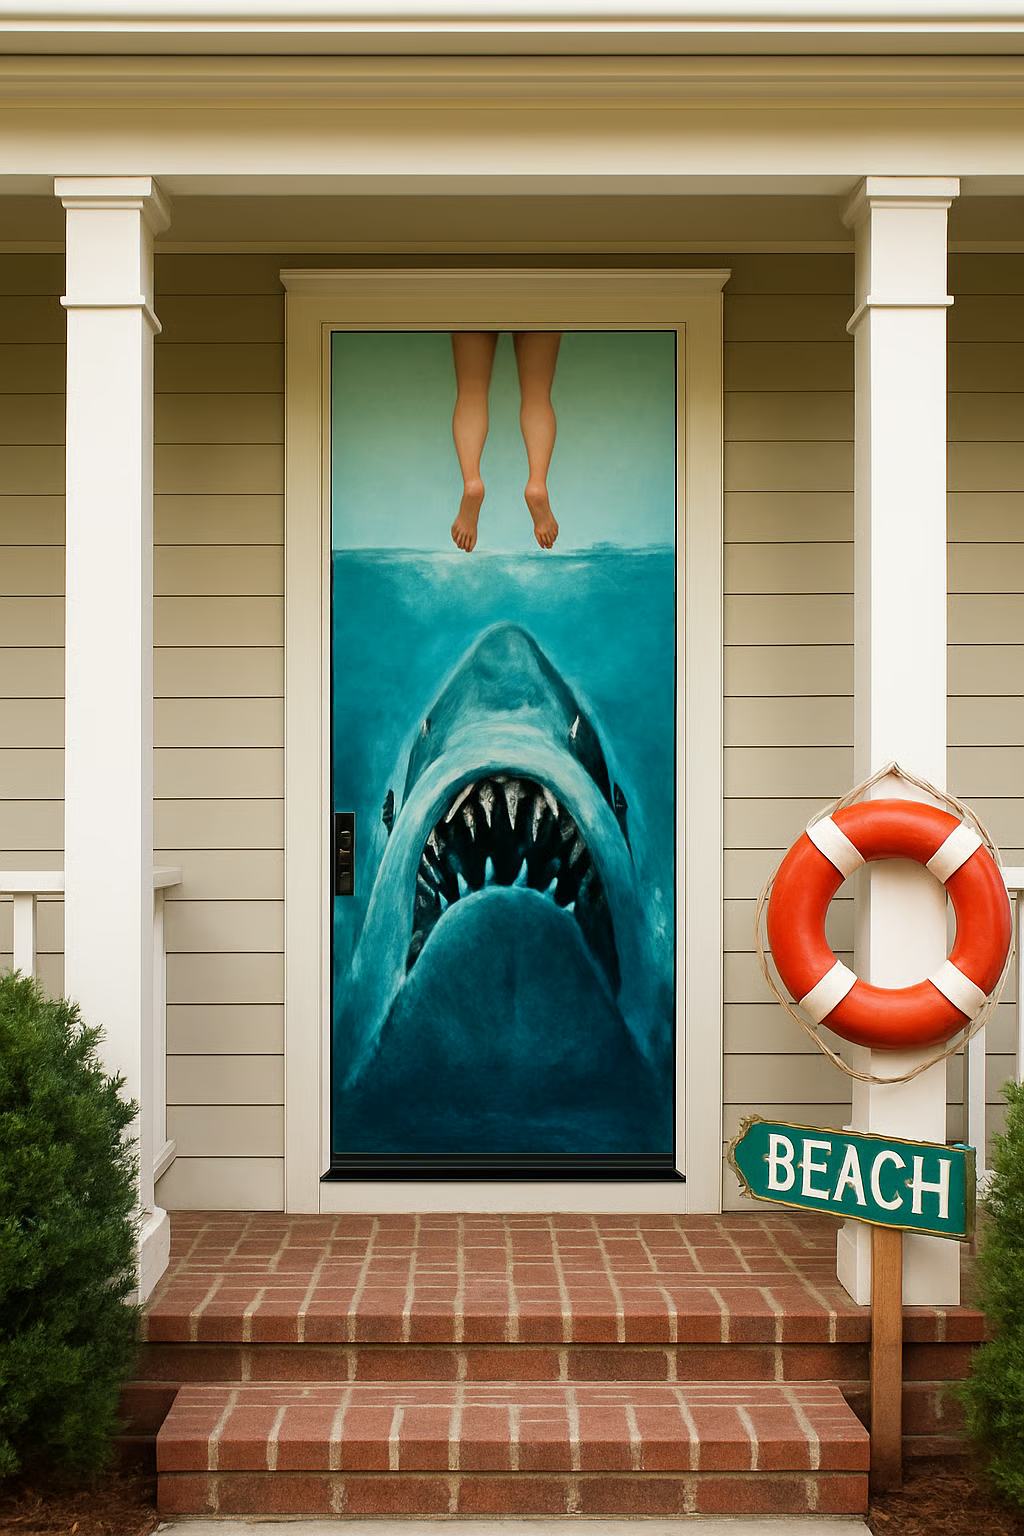
Transform your front door Halloween decor into a scene straight from the movie. Paint the door to look like the surface of the ocean, using blue waves along the bottom for depth. This simple base sets the stage for the shark attack theme.
Create the shark’s massive open mouth rising up the length of the door. Use bold white teeth cut from foam board or cardboard to frame the entrance. The large scale makes the design easy to see from the street, which works well for a Halloween door decorations contest.
Suspend a pair of swimmer legs from the top of the doorframe to complete the attack effect. You can use mannequin parts or craft them from pool noodles and fabric. This detail adds movement and draws attention to your Halloween outdoor decorations.
Place a life ring or small beach sign on the porch for context. These small touches help sell the theme and make your Halloween front door decorations more recognizable. Judges in a Halloween door contest often reward clear, bold designs, so focus on strong graphics and scale.
Execution Tips
Choose durable materials that handle outdoor weather. Waterproof paints, sturdy foam boards, and LED-safe lighting prevent damage from rain or wind. Avoid paper or thin cardboard unless you plan to keep decorations indoors.
Think in layers to build depth. Start with a backdrop on the door itself, then add props that spill onto the steps. Use overhead pieces like hanging bats or draped fabric to frame the space and make the setup feel complete.
Mix DIY projects with store-bought accents. Handmade wreaths or cutouts add personality, while ready-made props save time and ensure a polished finish. This balance keeps costs reasonable without sacrificing style.
Lighting changes the mood instantly. Try:
- Soft spotlights to highlight a wreath or centerpiece
- Uplighting at the base of props for dramatic shadows
- Colored bulbs to add atmosphere without overpowering details
Pay attention to scale. Oversized props, bold cutouts, or large graphics stand out more than small details. This matters when trick-or-treaters or judges only get a quick look at your door.
Keep safety in mind. Secure heavy items so they don’t tip over, and use outdoor-rated extension cords for lights. This protects both your decorations and your visitors.
Choosing the Right Materials
The materials you use affect how long your decorations last and how safe they are to display. Durable supplies protect against outdoor conditions, while sustainable choices reduce waste and make cleanup easier.
Weather-Resistant Options
Outdoor decorations face wind, rain, and changing temperatures. You should choose materials that can handle these conditions without falling apart. Plastic, metal, and treated wood often hold up better than paper or thin cardboard.
For fabrics, look for polyester, nylon, or weather-treated burlap since they resist moisture and dry faster than cotton. If you use paint, select outdoor acrylic or spray paint that won’t peel quickly.
Lighting is another factor. Use LED string lights rated for outdoor use and avoid extension cords not designed for wet conditions. Motion-activated props should also be labeled weatherproof to prevent damage.
A quick reference for durable materials:
| Material | Best Use | Why It Works |
|---|---|---|
| Plastic | Props, signs | Water-resistant, lightweight |
| Treated Wood | Frames, stands | Strong, long-lasting |
| Polyester | Fabrics, banners | Dries quickly, resists mildew |
| Outdoor Paint | Surfaces, designs | Withstands rain and sun |
Eco-Friendly Alternatives
If you want to reduce waste, you can use materials that are reusable, recyclable, or biodegradable. Reclaimed wood, cardboard, and natural fabrics like cotton or hemp make good bases for decorations.
You can also reuse items you already have. For example, repurpose old sheets into ghost figures or paint cardboard boxes into tombstones. This saves money and keeps trash out of landfills.
For lighting, choose solar-powered lanterns or battery-operated LEDs instead of single-use glow sticks. These options cut down on plastic waste and last longer.
When possible, avoid decorations coated in glitter or made from mixed materials that are hard to recycle. Stick to simple, single-material items that you can compost or recycle after use.
Eco-friendly choices may require a little more planning, but they make cleanup easier and reduce the amount of waste you create during the season.
Winning Strategies
Judges often look for originality, cohesiveness, and polish. Start by choosing a theme that people recognize but don’t see often. A door inspired by The Birds or The Munsters stands out more than another pumpkin or ghost design.
Think in terms of storytelling. The strongest entries feel like a small scene, not just random props. For example, a “witch’s kitchen” door looks more complete if you add a bubbling cauldron, broom, and scattered spell pages.
Don’t stop at the door itself. Extend your theme to the porch or entryway. Use railings, steps, and even lighting to make the scene immersive. A flickering lantern or subtle sound effect can make your setup more memorable.
Pay attention to fine details. Small touches often separate good designs from winning ones. Items like a tipped birdcage, scattered apples, or a pair of ruby slippers can spark curiosity and draw people closer.
You can use a simple checklist to stay on track:
| Focus Area | Key Tip |
|---|---|
| Theme | Pick recognizable but less-used ideas |
| Storytelling | Build a scene, not just decorations |
| Space Use | Extend design to porch, steps, and lights |
| Details | Add small props that reinforce the story |
These strategies help your door feel thoughtful, complete, and ready to impress both judges and guests.
Safety Tips for Outdoor Decorations
Outdoor decorations can add excitement to your home, but they also bring risks. Paying attention to fire hazards and making sure items stay in place during bad weather will help prevent accidents and damage.
Fire Safety Considerations
When using lights or electrical decorations, check the label to confirm they are rated for outdoor use. Indoor-only products can short out in wet conditions and cause fires. Always use outdoor-rated extension cords and keep connections off the ground to avoid water exposure.
Candles and open flames should be avoided near walkways or doorways. Costumes, dried leaves, and fabric decorations can catch fire quickly. Instead, use LED candles, solar lights, or battery-powered lanterns for a safer glow.
Inspect cords and plugs before setting them up. Frayed wires or cracked sockets increase the chance of sparks. Replace damaged items instead of trying to repair them.
Keep electrical decorations away from flammable materials such as hay bales, paper, or fabric. A safe setup reduces the chance of fire spreading if something goes wrong.
Securing Decorations Against Wind
Wind can knock over inflatables, topple props, or blow lightweight items into walkways. Anchor large decorations with stakes or sandbags to keep them steady. For inflatables, use all provided tie-downs and check them regularly.
Avoid placing lightweight items where they can block paths or blow into the street. If you use hanging decorations, choose sturdy hooks or brackets instead of tape or string that can loosen.
Check the weather forecast before Halloween night. If strong winds or storms are expected, bring in fragile items and unplug electrical decorations. This prevents damage and keeps your yard safe for visitors.
For tall decorations like arches or door frames, double-check stability. A simple test is to tug gently—if it shifts easily, add more support.

