11 Ghost Pumpkin Painting Ideas
Hauntingly Pretty: 11 Ghost Pumpkin Painting Ideas You Haven’t Seen Before
Ghost pumpkin painting is a fun and easy way to decorate for Halloween without the mess of carving. It’s perfect for anyone looking for a simple project you can do with your family or on your own.
You can bring personality and creativity to your Halloween display by trying out new ghost pumpkin painting ideas. Whether you like cute or spooky designs, painting pumpkins gives you lots of options and lets you get creative with your decorations.
Haunted Harvest Moon
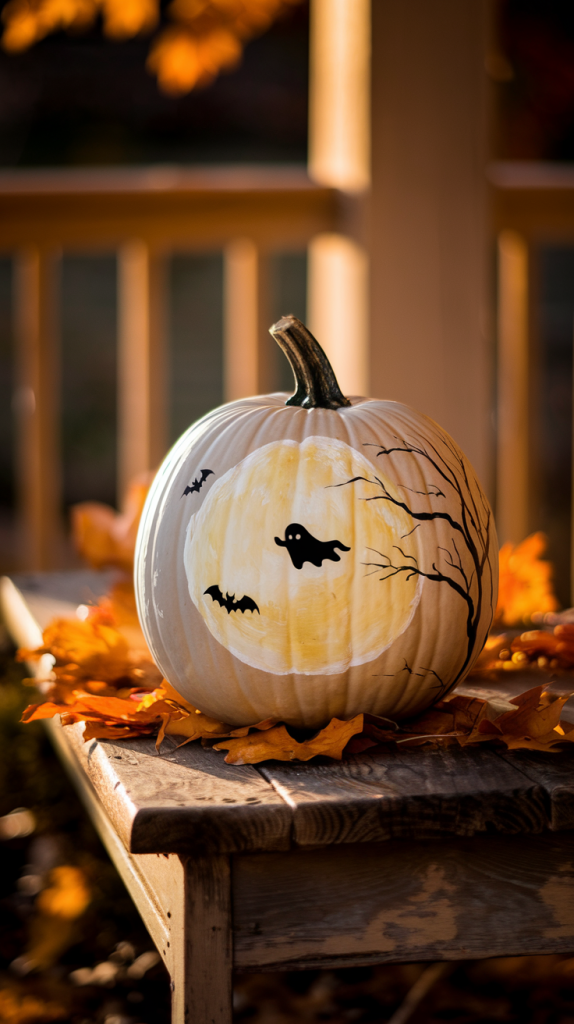
Start with a clean white pumpkin for a great canvas. Use pale yellow paint to create a bright harvest moon on one side. Make sure the moon is big enough to stand out.
Next, paint a small black ghost silhouette drifting over the moon. The ghost adds a fun and spooky vibe. Use thin brushes for smooth edges.
For more detail, paint a few tiny black bats flying by the moon. Sketch out thin bare tree branches underneath for a dark, haunted look.
Set your pumpkin on a wooden table or a porch bench. Scatter golden and orange leaves around it. This simple setup creates a magical and spooky scene, perfect for fall decorating.
Peek-a-Boo Lace Ghosts
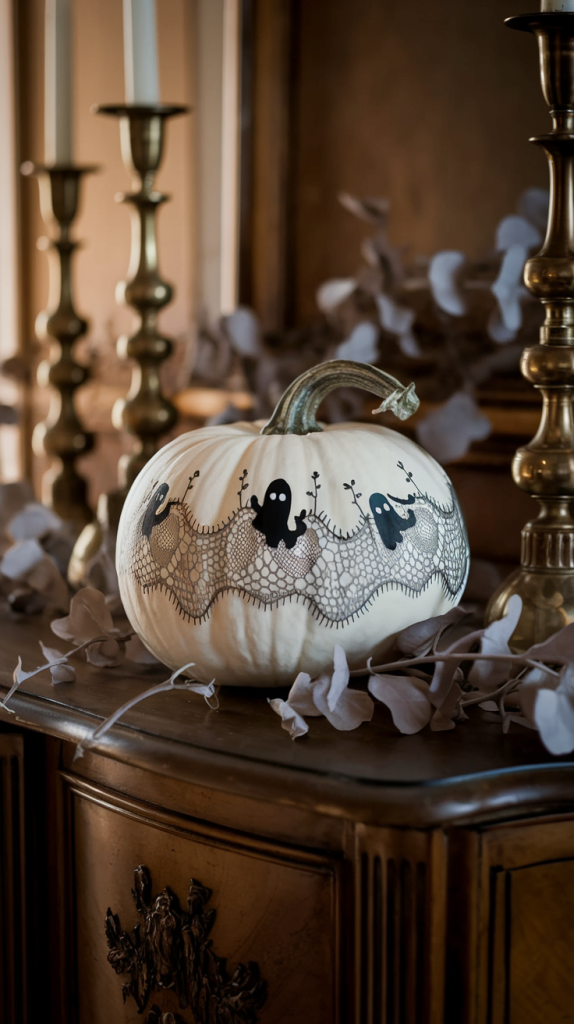
If you want your ghost pumpkin to feel extra special this year, try a peek-a-boo lace theme. Start by painting your pumpkin a crisp white. Using a thin brush and soft gray paint, add lace-like swirls across the surface.
To give it a fun twist, hide small, spooky ghost shapes behind the fancy lace patterns. It’s an easy way to add a bit of Halloween magic. Scatter a few ghosts peeking from behind each swirl—they’ll look as if they’re popping out from lacey shadows.
This style goes well with vintage decorations. Place your lace ghost pumpkin next to old candlesticks, dried flowers, or faded books. The mix of playful ghosts and detailed lace brings a gentle and inviting Halloween vibe to any space.
Ghost in a Snow Globe
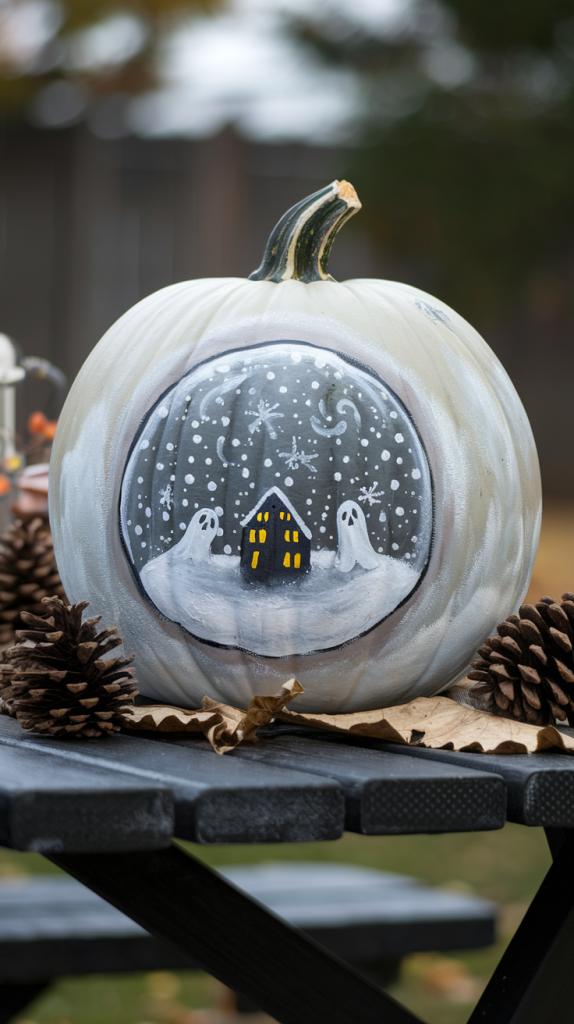
Imagine your pumpkin transformed into a little wintery world. Start by painting a clear circle or dome on the front of your pumpkin to look like glass. This is where your snow globe scene will appear.
Inside the globe shape, use white and light grey paint to make tiny houses and floating ghost shapes. Add small black dots for ghost eyes to give them character. Sprinkle little white dots everywhere to create falling snow.
Paint snowy hills at the bottom to ground your scene. A few pine trees or lamp posts can make it feel like a real winter town. Try using silver or blue glitter for some extra sparkle.
The finished pumpkin will look like you trapped a whole ghost village inside a snow globe. This idea makes your Halloween display look creative and magical. It’s a fun project and perfect for both kids and adults.
Floral Phantom
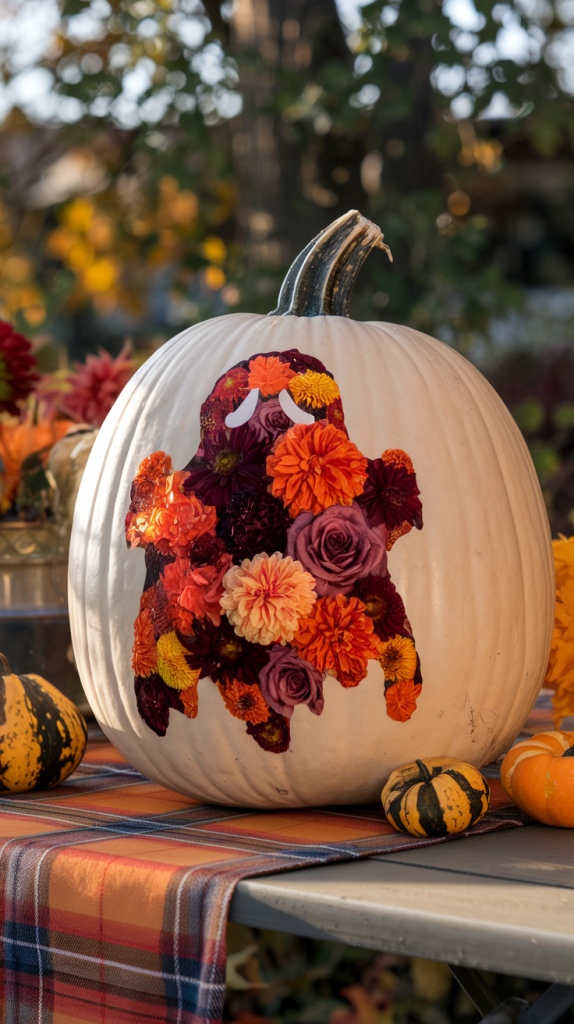
Give your pumpkin a fresh style by painting a graceful ghost silhouette right on its surface. Instead of the usual plain white, fill your ghost shape with fall flowers—dahlias, mums, and marigolds in cozy orange, burgundy, and mustard colors. This will make your ghost pop against any background.
Pick up a paintbrush and layer small flower details inside the ghost shape. Use gentle strokes and add leafy stems for a softer look.
This design blends Halloween fun with the beauty of autumn. Set your pumpkin as a centerpiece, and it will stand out at parties or family dinners.
The floral ghost is simple to make, but the results are charming. You get both a little spook and a lot of style wrapped into one pumpkin. Try arranging a few together for an even bigger statement.
Gilded Whisper
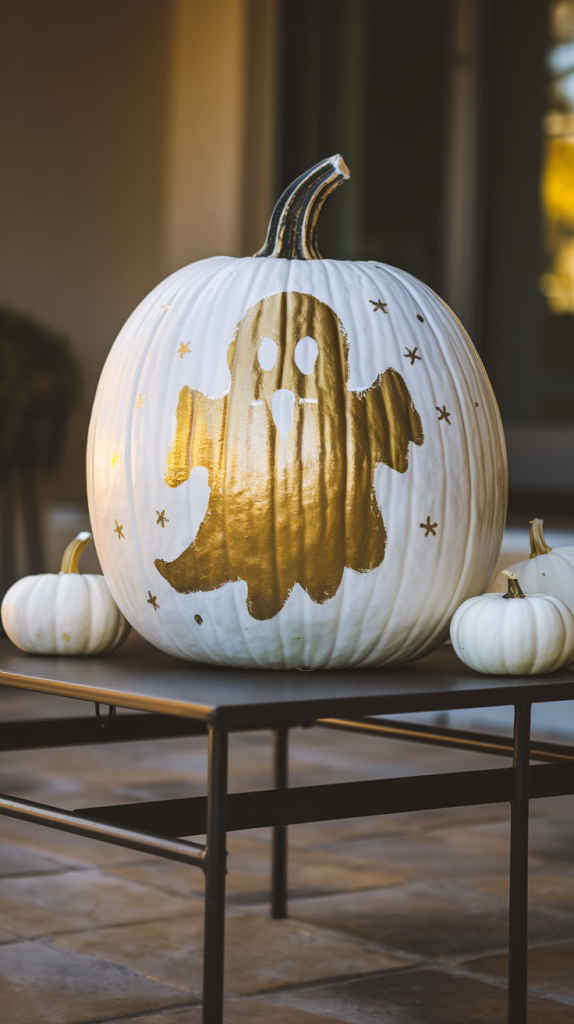
Create a sense of luxury this Halloween with the Gilded Whisper pumpkin. Start with a clean white pumpkin as your base. Use metallic gold paint to form a simple ghost silhouette at the center.
Add small golden stars around your ghost for a magical, starry sky effect. The shine from the gold will catch the light and stand out, even in dim rooms.
To finish your display, group your gilded pumpkin with gold candlesticks and a few small neutral pumpkins. This combination brings an upscale feel to your Halloween decorations while staying playful and unique.
If you want your decorations to feel special, this idea can blend with any home style. It’s easy, eye-catching, and adds something different to the usual pumpkin line-up. Families and guests will enjoy the contrast of spooky and stylish.
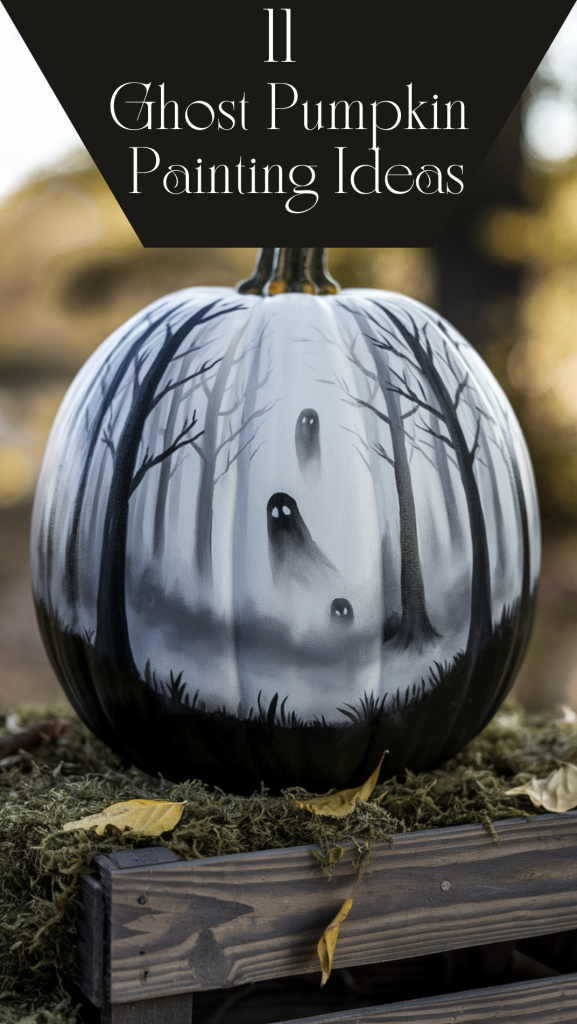
Foggy Forest Spirits

Imagine your pumpkin wrapped in a misty forest scene. Start with a base coat of white, then paint slender trees using dark gray or black. Let the trunks stretch upward, leaving gaps for the fog.
Next, use a soft brush or a sponge to add layers of thin, wispy gray around the trees. This creates the look of thick morning fog winding through the forest. It’s fine if some areas are darker or lighter, since fog never sits the same everywhere.
For the spirits, add faint white shapes peeking from behind the trees or gliding between them. Simple oval heads and flowing bodies work well. You don’t need a lot of detail—keep them light and a little see-through so they blend into the mist.
This design gives your pumpkin a calm, spooky feeling. It fits well on porches and steps, looking especially good on cool autumn evenings. Kids and adults alike will enjoy seeing which spirits appear from the fog.
Glow-in-the-Dark Graveyard
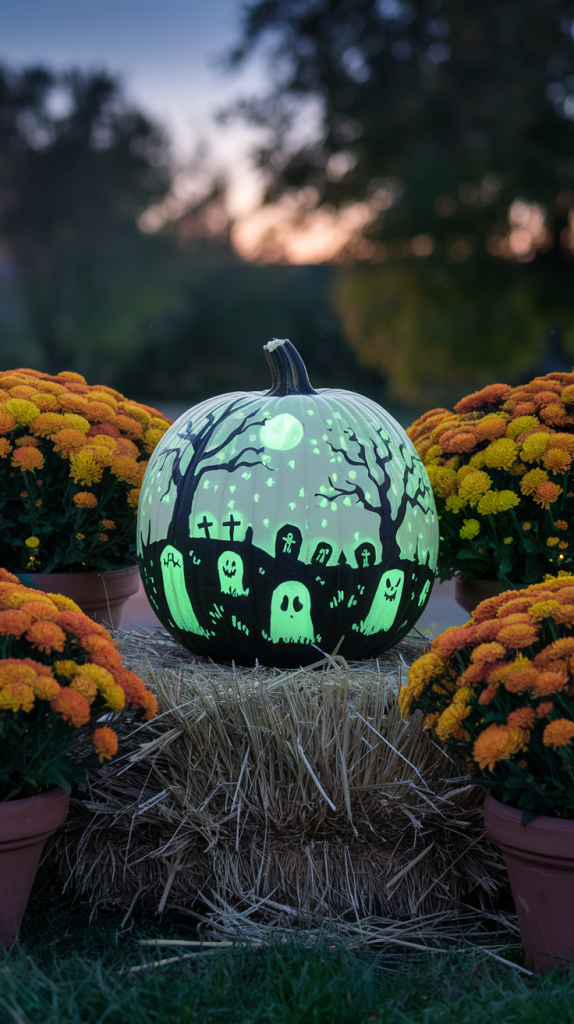
You can create a glowing graveyard scene right on your pumpkin using pale green glow-in-the-dark paint. Paint small tombstones, a few floating ghosts, and a simple moon. You don’t need many details—just enough shapes to give it the right Halloween feeling.
During the day, your pumpkin looks simple and a little mysterious. Once the lights go out, the graveyard scene shines with soft green light, making the ghosts and tombstones easy to spot.
This design gives you a two-in-one look: subtle in daylight and spooky when it’s dark. You can set your pumpkin outside to soak up sunlight so it glows as soon as night comes.
Use fine brushes to paint your ghosts so they stand out against the pumpkin. Try adding faint lines for grassy hills or clouds to finish your scene. Your glowing graveyard pumpkin will fit in perfectly with any Halloween display and will impress anyone who walks by.
Patchwork Ghost Quilt
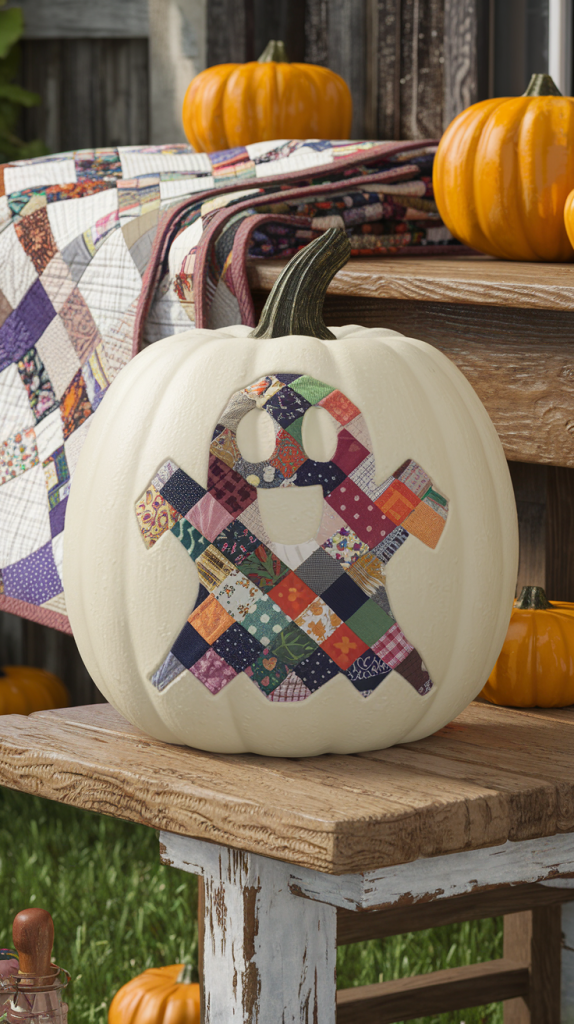
To make a patchwork ghost quilt pumpkin, start by painting your pumpkin white. Let it dry completely before moving to the next step. This white base will help your patchwork designs stand out.
Draw the shape of a classic ghost in the center of your pumpkin. Use a pencil so you can erase and fix mistakes easily.
Inside the ghost shape, paint small squares or rectangles to look like quilt patches. Try different patterns like plaid, floral, gingham, and dots. Choose warm autumn colors, such as orange, yellow, brown, and deep green.
Outline each patch with thin black lines for a real quilt look. Add some little stitches or crisscross lines using a fine brush or black marker.
Finally, paint simple eyes and a mouth to give your ghost a friendly face. Your patchwork ghost quilt pumpkin will look cute and cozy, perfect for farmhouse-style Halloween decorations.
Starry Night Specter
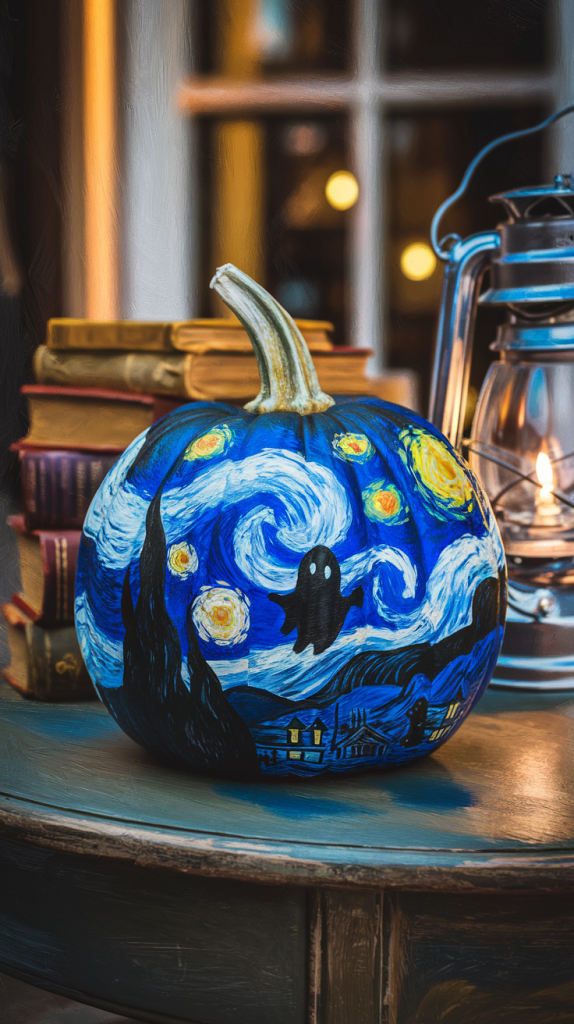
Imagine your white pumpkin as a canvas for a swirling night sky. Use deep blues and a bit of black and white paint to create bold, wind-like swirls around the pumpkin, just like in Van Gogh’s famous painting.
Once your sky is painted, let it dry. Then, with black paint, add a simple ghost shape on one side of your pumpkin. The ghost can have round eyes and a wavy bottom to look friendly and spooky at the same time.
Make your scene sparkle by dabbing on small gold dots or streaks to look like shining stars. You don’t have to make it perfect—swirls and lines add lots of character.
Set your pumpkin on display where the painted stars can catch the light. It’s an easy way to bring art and Halloween together with your ghosty addition.
Try different sizes for the swirls, and experiment with the ghost’s shape. Each pumpkin you paint can have its own special look.
Candy Corn Ghost Fade
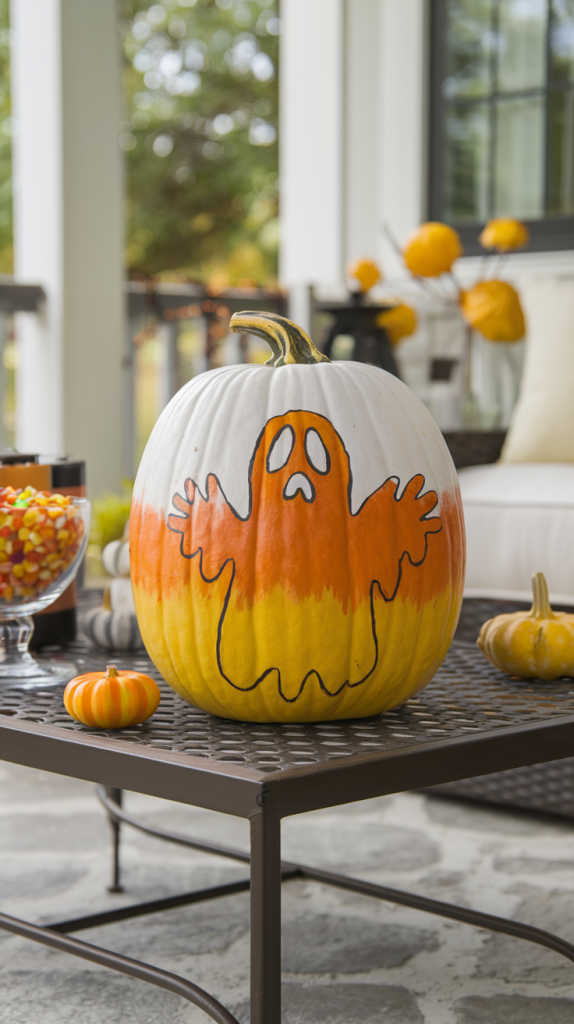
Try giving your ghost pumpkin a twist with a candy corn fade. Start by painting the bottom of your ghost shape in yellow. Next, add orange in the middle section. Finish with white at the top to create that candy corn effect.
This color scheme makes your ghost look playful and perfect for Halloween. It’s a great way to use classic fall colors without needing to carve your pumpkin.
Place your candy corn ghost pumpkin near your front door or on your table. You can put candy bowls beside it to make your display even more festive. This idea brings a bright, retro feel to your decorations.
If you want, add black eyes and a simple mouth to finish the ghost’s face. The bright colors stand out and catch the eye. This project is simple enough for kids or adults to do together.
Use acrylic paint for smooth, bold colors. Make sure your pumpkin is clean and dry before starting. A clear sealer on finished paint will help your design last longer.
Vintage Cameo Phantom
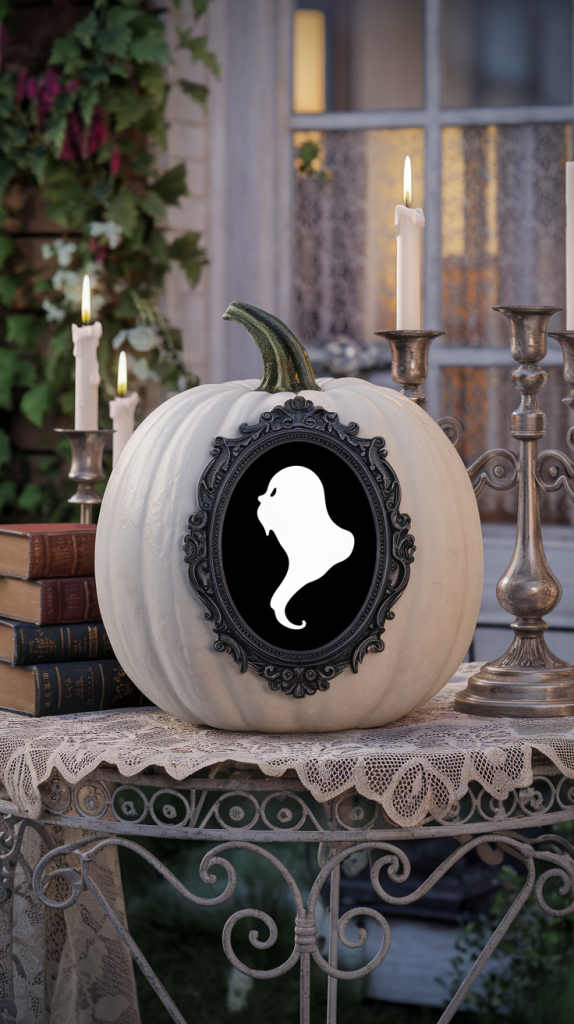
For a unique vintage look, give your pumpkin a cameo-style makeover. Start by painting your pumpkin white. Once it dries, create an oval-shaped black frame right in the center.
Inside the oval, use black paint to add the side profile of a ghost. Make sure the outline is smooth and simple, like a real Victorian cameo. This design works especially well with pumpkins that are medium or large.
Set your ghost cameo pumpkin out with lace tablecloths, old books, and candles for a classic Halloween feel. The old-fashioned style adds a gentle spookiness to your decor.
You can even mix in a few smaller pumpkins painted in matching colors for a little extra flair. This idea lets you combine fun Halloween style with a vintage mood.
Creative Tips For Ghost Pumpkin Painting
Painting ghost pumpkins can be fun and simple if you prepare well and use the right materials. Steps like picking safe paints, priming the surface, and sealing your work can help your creation last longer and look its best.
Choosing The Right Paints And Brushes
For painting pumpkins, acrylic paints work best. They provide bright color and stick well to pumpkin skin. Choose non-toxic paints, especially if kids will help. These come in many shades, so you can mix white, gray, and even glow-in-the-dark paint for extra spooky effects.
Pick a few brush sizes to help you paint both large areas and small details. Use a wide, flat brush for the background and a thin, pointed one for drawing the ghost faces. Foam brushes can be handy for smooth coats. If you like, try using stencils or sponges for making patterns or special effects.
Here’s a quick reference:
| Paint Type | Best Use |
|---|---|
| Acrylic | Main pumpkin, details |
| Glow-in-the-dark | Eyes, outline |
| Non-toxic | Kids’ projects |
Prepping Your Pumpkin For Painting
Before you start painting, wash your pumpkin with warm, soapy water. Dry it well so paint will stick. Clean pumpkins make for smoother painting and help keep the colors looking bright.
Check the pumpkin for dirt or soft spots. If you find any, gently rub away the dirt with a damp cloth and avoid painting over any mushy areas. A smooth, clean surface will make painting easier and your design last longer.
If you want the paint to stay on even longer, use a primer or a thin coat of white acrylic paint as a base coat. Let this base dry completely before adding your ghost design. This step can really help the colors pop.
Sealing And Preserving Your Ghost Pumpkin Painting Artwork
After you’ve finished painting and the pumpkin is dry, add a sealer to help protect your work. Look for a clear acrylic spray sealer for best results. This adds a light, invisible layer over your painting and helps keep the colors from fading or running.
Spray the sealer outside or in a well-ventilated area. Hold the can about a foot away from the pumpkin and spray a light, even layer. Let it dry fully before moving or displaying your pumpkin.
For extra protection, keep your painted pumpkins indoors away from heat and moisture. This helps slow down rotting and keeps your artwork looking fresh for longer. If you use a real pumpkin, remember it won’t last forever, so display it just before Halloween for best results.
Decorating With Painted Ghost Pumpkins
Painted ghost pumpkins can brighten up your home and yard during Halloween. You can use them in many places and find safe ways to show them off both inside and outside.
Incorporating Pumpkins Into Fall Decor
You can place ghost pumpkins on your front porch steps to greet guests. They look good grouped with other fall items like hay bales, dried corn, and colorful gourds. Create a fun scene by adding small, painted pumpkins with big ones for variety.
For indoor decorating, try placing ghost pumpkins on your dining table as a simple centerpiece. Arrange a few on a mantel with string lights or candles for a cozy mood. If you have shelves, set a ghost pumpkin by your favorite books or framed photos.
Mixing pumpkins with leaves, pinecones, or acorns gives your space a more natural feel. For parties, line up several ghost pumpkins along the snack table. You can even write names on smaller pumpkins with paint pens to use as place cards.
List of decor ideas:
- Front porch displays
- Mantel or shelf accents
- Table centerpieces
- Bookcase or entryway arrangements
- Backyard party decorations
Safe Ghost Pumpkin Painting Display Ideas For Indoors And Outdoors
When displaying ghost pumpkins outside, keep them under cover to protect them from rain. Set them on sturdy surfaces where they will not roll or fall. Avoid placing them where people might trip.
For indoor use, use battery-powered candles or fairy lights near pumpkins for a gentle glow. Avoid real candles, especially if you have children or pets. Plastic or foam pumpkins work well for inside displays because they do not spoil.
If you display real pumpkins, place a tray or plate underneath to keep surfaces clean. Use non-toxic paints to make sure your decorations are safe around food and little ones. Clean your pumpkins before painting and let them dry so the color lasts longer and looks neat.